
We repair quite a few broken truss rods here at Strange Guitarworks, and oftentimes it’s not a simple endeavor. Every repair is unique, which is one of the reasons we love our jobs: it’s never boring. Fixing this broken Gibson truss rod in this vintage Grabber was a doozy: the headstock was broken off, the truss rod was broken and bent, and the neck had developed a serious kink near the heel. The owner, Jamie (the most excellent bartender at our local watering hole & music venue The Maple Leaf, and leader of the Future Cowboys) wanted to keep the instrument as original as possible AND keep the work under a certain budget! This wasn’t going to be easy, but we’ve got ourselves a nasty little habit of never backing down from a challenge.
Here you can see that the scarf joint is coming apart, and it looks like somebody tried to repair it themselves (which is rarely a good sign):


The fretboard was severely bowed, and was coming off the neck. Awesome!

The truss rod was bent and pushing up against the fretboard, and in this particular case the only way to fix it was to remove the fretboard. There’s no real easy way to do this, so I removed the frets, then heated the neck to soften the glue, and carefully ran a knife separating the fretboard from the neck.

The fretboard came off much cleaner than expected. This was unfortunately not an indicator of an easy job to come.

Single acting truss rods, as used by Gibson and Fender, sit in a curved channel inside the neck. As they are tightened, the push against the center of the curve, forcing the neck backwards. I often try to remove these types of rods by separating it from the anchor and sliding it out, but that wasn’t going to work with this broken Gibson truss rod. I had to remove the center strip of wood, which is the curved part that the truss rod pushes against. I had few hopes that this piece would come out clean – using steam would possibly swell both the neck and the center strip, and would take far too much time. Even though I used heat and moved slowly, the center strip didn’t want to come out in one piece. No matter – I assumed I would have to make a new one anyway.
As I was removing the center strip, I discovered the aforementioned “repair” that had previously been done. Somebody tried to screw the scarf joint back together, with the tiniest, cutest wood screw ever! And they didn’t even consider that there might just be a truss rod in the way, thwarting their efforts. Ha!


Since the broken truss rod was ruined anyway, I used it as leverage to remove the center strip. The truss rod bent significantly as it came out, as not only was it partially rusted but also had been glued into the channel (which is probably why it broke in the first place).

With the neck finally taken fully apart, I could get down with the business of actually fixing the thing. The first order of business was to reattach the headstock via the scarf joint. This was to be tricky, as the scarf joint is cut and glued at the factory while the neck is still a rough blank before carving. It’s easy to mate square joints, and it’s something else entirely when dealing with a complete neck.
The headstock needed to be aligned dead center, but there wasn’t going to be an easy way to clamp them together, as there are no parallel surfaces on a carved neck. So I made a small temporary tenon to sit in the truss rod channel, which would center the headstock to the neck:


When gluing two surfaces together, one can’t just trust them to stay put whilst being clamped, so I created some pins to hold the two pieces in place. Aaron had previously made two brass locating pins which we use for pining floating bridges, and these worked fabulously for this job as well. I drilled two holes into the headstock, installed the pins, and pushed the headstock down onto neck, where the pins left indentations to show me where to drill in the headstock, and then installed wood pins in the holes.


With the pins in place and the tenon secured, it was finally ok to clamp.

Finally, I had a neck in one piece! Now it was time to mate it back to the fingerboard. Not so fast, though! Both the fretboard and neck weren’t remotely flat, and weren’t going to go together well at all. Since our belt sander is too short for this job (and a larger one would be too aggressive in removing wood anyway), I hand sanded each piece flat, constantly checking for level in all directions. I think I removed as much skin from my fingers as I did maple from the neck…

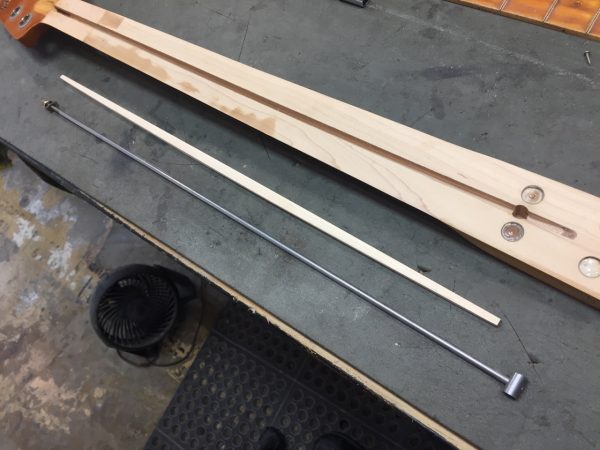
Next I had to make a new truss rod. This is a fairly simple affair: make some threads on some steel bar, install an anchor, and that’s it!


Almost there! Next I made a new center strip out some maple we had laying around the shop. I carved the correct curvature into the bottom, installed it in the neck on top of the new truss rod, and planed the top flush with the neck.


Now the fretboard was to be glued back on. I created some pins in the fretboard corresponding with pins in the neck, and tied it all up with a bunch of surgical tubing (which is really the best way to clamp these up, as they apply equal pressure throughout the work).

Finally, we’ve got ourselves a neck! All that extra work sanding everything flat earlier really paid off: the neck was straight enough to fret without having to plane the fretboard and remove the original finish. This not only saved a lot of time, we wouldn’t have to refinish the fretboard, which helped keep costs down. Huzzah!

After fretting the neck, I used some maple colored epoxy to fill in the missing wood that had previously broken off the end of the scarf joint, and filled in the hole where the tiny screw had been. I only did some cursory finish work here, to keep things under budget, but we may end up hiding this repair with some paint in the future. It doesn’t look too bad, but most importantly it’s smooth to the touch.

Here it is, all done! I refretted it with original spec frets, made a new bone nut, and set it up. It plays and sounds fantastic, and we even managed to keep the job within Jamie’s budget! Thanks for the challenge, Jamie! We hope to see this bass on the next Future Cowboys gig!


