
Vintage Fender musical instruments are getting more and more valuable, and considerably harder to find, all the time – in part because there’s a “cool factor” in a road-worn and battle-scarred guitar that you simply can’t find in a more recently manufactured counterpart. Modern urethane finishes don’t crack, chip or wear through the way the old 1960s nitrocellulose lacquer did. So, if you can’t get your hands on the real thing, the obvious solution is to, well, fake it. Emulating the aging process of an instrument that has endured decades of abuse is a process coined as “relicing”. Since it’s become such a popular aesthetic proclivity among players and collectors, we thought we’d show our process for restoring and relicing a vintage Fender bass neck.
Our friend Adam purchased a mid-1970s Fender Precision Bass neck on eBay that had a little too much damage for his taste, so he hired us to fix the damage and dial back the distressed look of it a bit. He also asked if we could refinish it with a ’60s era matching headstock to go with his custom body. Now, to avoid persecution from the Fender historians and purists reading this I’d like to clear up a couple of things before proceeding. For the purposes of this article we’re going to call this color “Metallic Root Beer”. This is not a vintage Fender custom color, but they did use a color called Metallic Root Beer in the late 1990s. We actually used a can of Testors Root Beer model car lacquer to approximate the Fender color (most vintage Fender custom colors were actually car finishes first). Additionally, this ’70s P-Bass probably would have fallen outside of the years the Fender factory was making instruments with matching headstocks, so this project is not a true to history restoration.
When the neck came in, it was not in great shape. The headstock looked like a dog had chewed on it, the frets were worn and oxidized, and it was finished in the polyurethane paint the Fender factory was using by the mid-70s (with the exception of the headstock face, which was still sprayed with lacquer to allow chemical compatibility with the celluloid waterslide decals they were still using, hence the disproportionate yellowing on the face of the headstock).


The ’60s era Fender conversion would include replacing the frets with vintage Fender OEM spec fret wire and refinishing the fretboard with an aged clear lacquer, so the first thing I did was pull the frets and true the fretboard with our Plek Machine so that the board would be prepped for color matching when the headstock was ready.


Once the fretboard was trued with the proper surface plane and radius, I moved onto repairing the mangled headstock.


I found a scrap piece of maple with a very close grain pattern match to rebuild the headstock and glued it together with Original Titebond woodglue.


After letting the glue set overnight, I rough-cut the headstock shape with a bandsaw and arrived at the final shape with a combination of rasps, files and sanding blocks.


After sanding everything flush, the grain pattern on the new maple patch shifted ever so slightly, so I used a few color pencils to connect the lines. Maple grain patterns usually have plenty of irregularities, so a few jagged lines here and there seem to come out looking pretty natural.


As you can see, the new maple patch hasn’t had 40+ years to oxidize and naturally darken, so I taped off the rest of the headstock and mixed and sprayed a brown-tinted lacquer to match the two pieces of wood.

Once the two pieces of wood matched to my eye, I mixed a yellow-tinted lacquer to match the natural aging of the surrounding clear finish. I also used this color for the base coat on the fretboard surface.

Happy with the color coat, I removed the original paint from the face of the headstock, sanded everything flush, and prepped it for the new paint.


The first phase of any metallic paint application is a white vinyl sanding sealer. This fills in the 320 grit sanding scratches and provides a uniform primer coat over the substrate for the metallic base coat.

Once the sealer coat is cured, the metallic base coat can be applied. It usually takes 2-3 coats to achieve full coverage.


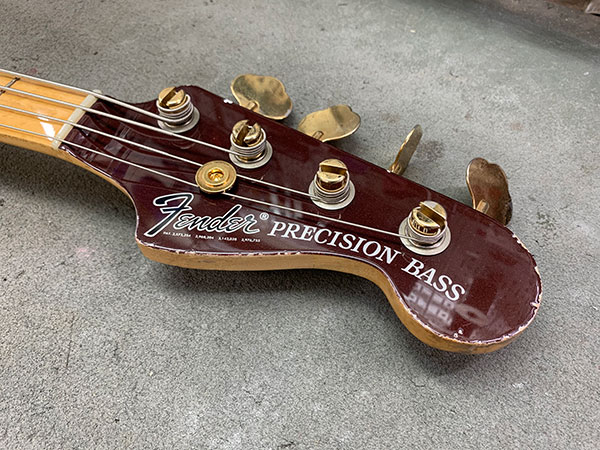
Once I applied the metallic base coat I began the relicing process. I went through with an X-Acto knife and chipped out the corners where there was existing damage to the headstock. One can do this after the clear coat is down, but I like to start it at this stage so I don’t have to chip out as much finish at the end. I find this way to be more controllable, but there are no hard and fast rules to this stuff. It’s a bit of an art and experimentation is key. We wanted it to look only moderately beat up, and it came out pretty awesome, we think:


Happy with the color matching, I took the neck back into the spray booth and started building clear coats.

After building up enough of a clear lacquer bed to safely level and polish, I prepared the waterslide decal that would have been used by Fender on matching headstocks. (Legally, we can’t and won’t buy counterfeit logos, but if one is brought to us by a customer we’ll put it on.)


After very carefully applying the waterslide decal, I started building the second round of clear coats. Always “dust” the first few coats of lacquer onto the waterslide or you risk melting the celluloid to the point of eating holes into it. I’ve definitely had an object lesson in this in the past…

The next phase in the finish work is my least favorite part, and the biggest reason why finish work tends to be so expensive: wet sanding…


Once the finish work was finally complete, I installed the new frets. To match the 1960s era Fender OEM spec fret wire I used Jescar .043″x.080″ nickel/silver wire. We almost always use Jescar wire at the shop. It’s good stuff.


With the fret ends bevelled and polished it was just a matter of installing the hardware and putting the finishing touches on the relic work.


The final relicing phase was to add some “checking” to the lacquer. Checking refers to the cracks that occur in the lacquer over time as a result of gradual chemical off-gassing, as well as stress from the wood expanding and contracting underneath the finish during temperature and humidity fluctuations.
To simulate this effect, I put the neck into a deep freezer and took it out, letting it warm up to room temperature a number of times in 20 minute intervals with all of the hardware installed. Turned out great!


After the final distressing stages were done, I made a bone nut from scratch, strung the neck up to pitch and leveled the frets in the Plek.

And here’s the neck reunited with the body! There are many ways to do this kind of work and there is no “right way” to do it. Awesome!


