
Most acoustic guitars will need a neck reset during their lifetime. Over the decades the string tension pulls the neck forward, causing the angle at which the neck joins the body to be incorrect – what we guitar techs call “underset”. An underset neck causes the string action to be very high, making it very difficult to play. One way to help compensate for an underset neck is to lower the bridge saddle, but eventually the saddle gets too low, which then ruins the tone of the instrument – there’s not enough downforce on the saddle to transmit string vibrations into the top efficiently. If you’ve got an acoustic guitar with high action and a low saddle, then chances are your neck angle is underset.
Many acoustic guitar manufacturers take future neck resets into account during the building stages: they finish the neck and body separately, and use a type of glue that can be melted to allow for pulling the neck off. Typically, an acoustic neck reset is a fairly straightforward, albeit complex, affair: melt the glue with heat and steam, remove the neck, rebuild the dovetail joint, reshape the heel, reattach the neck. Done! Unfortunately, certain guitar builders opt to use epoxy to glue their guitars together, instead of a more traditional hide or wood glue, making it all but impossible to repair. This week I battled with such a guitar, and I’m happy to say that I came out victorious – although I will admit that there was much swearing during the process.
It started simply enough: my new friend Josh brought in a new L. Benito acoustic guitar, which had a horribly underset neck. I was told that L. Benito was a guy who worked at the Taylor factory for a while before moving to his native county of Chile to begin building guitars. It was a fine guitar, except that the neck had been attached incorrectly at the factory, so the action was sky high.

Typically, the neck angle is supposed to shoot straight towards the top of the bridge, but this one was about 2-3mm below that. To demonstrate this, I placed a straight edge on the fingerboard, which should have rested just on top of the bridge, but instead came in much lower:

This was a clear cut case of a guitar needing a neck reset. This guitar had a bolt on neck (like most Taylor’s), so it shouldn’t have been a terribly invasive repair: simply heat the fingerboard extension off the soundboard, unbolt the guitar, and reshape the heel. Easy! I explained the process to Josh, and he liked the guitar enough to see the project through, so I got right down to it, believing that this would be a fairly straightforward task. Boy, was I wrong.
First, I began as I always do by heating the fingerboard extension, melting the glue between the fingerboard and the top. I heated up my fretboard iron and let it sit on the fingerboard for a few minutes, with the intention of slipping a knife under the board and having it off in a jiffy…


Once I’d gotten the fingerboard hot enough, I started to slip the knife into the seam and… nothing happened. Turns out that L. Benito opted to glue the fingerboard down with epoxy! Gah! Epoxy doesn’t melt until around 155ºC (311ºF), and I wasn’t about to cook this guitar, so there was no way I was getting this off easily. Normally I wouldn’t pursue an epoxy neck reset in this fashion, but since this was a bolt on instrument I figured that this would be the only epoxy I would have to deal with, so I went ahead and worked the fingerboard extension loose anyway. I knew it wouldn’t come away clean, but this is something I had prepared Josh for, and we were both committed to making this work. So I spent the next hour cutting under the fingerboard, hoping that the knife wouldn’t dig into the wood too badly.
After an hour of hard work, I finally go the fingerboard free. Hooray! Now all I had to do was unbolt the neck… but when I removed the bolts, the neck didn’t budge. Oh no! They epoxied the neck on, too! Why would they do such a thing? It was already bolted on – it didn’t need any extra glue. Not cool!
I called Josh and discussed his options: either I could just glue the fingerboard back down and call it a day, at no charge, or we could cut the neck off. Cutting the neck off could be messy, but at least it would make it playable, which was Josh’s main concern – so he decided to go for it. Oh boy…
I explained to Josh that this kind of invasive surgery could leave some scars, but I would do my best to minimize them. So first I taped off the body around the neck heel with painters tape and aluminum tape, which would prevent the saw blade from digging into the finish too much.

Then, very carefully and very slowly, I started cutting down through the heel towards the fingerboard. This was a bit nerve wracking, as there was no way of knowing what was going on under that heel. The bolts were going into threaded metal inserts – would the saw get stopped by the inserts halfway through the job? Were there dowels joining the neck and the body? What other sort of craziness was happening under there? This definitely qualified as exploratory surgery! I could very well be setting myself up for a ton of extra work, but that’s the way this job goes sometimes.
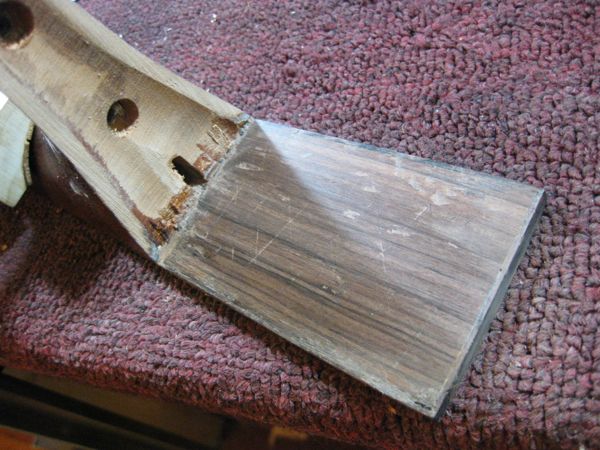
After sawing away for about 30 minutes (and only cutting through about 2-3 centimeters), my luck improved: the neck broke away from the body (which unfortunately didn’t allow for getting a good sawing picture). Here’s what I found:


The epoxy had ripped away huge chunks of the finish under the heel, which makes me wonder what they were thinking by gluing it in the first place. Epoxy is strong stuff, and should have been bonded directly to the wood, if stability is what they were going for in the first place (albeit completely unnecessary anyway, since it was a bolt on neck). And not unexpectedly, my knife had dug into the top a bit, which wasn’t too much of a problem – just a little bit of extra work to clean up. Oddly enough, they directly epoxied the fingerboard to the wood on the top (there was no finish under the fingerboard extension), which was a super strong bond – and completely unnecessary, as it isn’t a load bearing glue joint. Man, everything was backwards on this guitar!
Well, at least I got it apart with relatively minimal damage. Now I could get down to the meat of the job. First I spent a few hours filling in the ripped finish on the body, sanding it flush and polishing it up. Next I cleaned up the fingerboard and body with a combination of chisels and scrapers, so that when they were glued back together they’d join flush.

Next I cleaned up the neck heel, removing all the epoxy, and carving out the center, preparing it for the delicate process of setting the neck angle. Doing a proper neck reset is pretty challenging, as there’s a lot of things to consider: the pitch of the neck (affecting overall string action), neck twist (concerning the action balance from bass side to treble side), and the neck’s center line (so that the outer two strings are equidistant from the fretboard edges). Yeah, it’s complex, and it gets even trickier:
There’s a fairly complex formula that I use to determine how much material I need to take off the neck, which you can check out here: Liutaio Mottola Lutherie Information Website. Although this kind of formula is commonly used amongst luthiers and guitar techs, I think it’s best represented on their website (and since it’s copyrighted, I can’t post it here).
Of course, this formula only gets me a good starting point, and doesn’t account for neck twist nor the centerline. I began by taking a full millimeter off the heel, by marking it with a set of calipers and then using a sanding block to take it down to the line:

Over the next couple of hours, I would make a few passes with the sanding block, then put the neck back on and restring the guitar to pitch to check my work, then repeat the process until it was perfect. This is a time consuming process, which is usually a lot faster with a traditional dovetail joint, as opposed to the bolt on method. EVERY time I put the neck back on I had to attach and tighten the bolts, whereas the dovetail joint holds itself in place. Good thing I don’t charge by the hour!
Finally, after restring it around 10 times, everything lined up perfectly. The aforementioned straightedge lined up exactly to the top of the bridge, the high and low sides were at equal angles, and the centerline was dead on. Huzzah!


Now that’s all that was left was to glue the fingerboard back down. Sometimes I have to build an angled shim under the fingerboard extension, so that it follows the path of the rest of the fingerboard, but this one was off so slightly as to not matter (especially since I was doing a fret level after the neck reset). I glued the board down using Titebond wood glue, which DOES come off when heated (you’re welcome, future guitar techs!), clamped it down, and let it sit for two days.

Later in the week I did a fret level and setup on the guitar, and I’m proud to say that it came out beautifully! The action is now nice and low, and it plays clean. I even managed to minimize scarring – it looks pretty good for a guitar that just had it’s neck sawed off!


Phew! That was a LOT of work, but it was worth it. This guitar plays great and sounds fantastic. Normally I love doing acoustic neck resets, but dealing with epoxy is a major headache. Hopefully I won’t have to do this again for a long time!
